Designing an automation framework is a fundamental requirement for any successful automation project. A well-structured framework not only improves test efficiency but also ensures scalability, reusability, and easy maintenance.
Before building a framework, it’s important to have a clear strategy and planning. There are several popular approaches for designing automation frameworks, including:
- Hybrid Framework
- Page Object Model (POM)
- Data-Driven Framework
- Behavior Driven Development (BDD) Framework
In this tutorial, I will walk you through the basic framework creation in Java, along with the GitHub code reference to help you understand and implement it in real projects using Java.
Link to Github: Github repositoryThis tutorial is ideal for beginners who want to get hands-on experience in building a simple yet effective automation framework from scratch..
Page Object Model (POM) in Automation Framework:
The Page Object Model (POM) is designed by organizing the project into separate packages for pages and tests. Each application page is represented by its own dedicated class within the framework.
This approach provides:
- Clarity – Every page has its own class, making the structure easy to understand.
- No duplication – Test scripts are clean and reusable since common logic is maintained in one place.
- Built-in locator management – Locators are stored within the page classes, eliminating the need for a separate object repository.
By following POM, you ensure that your framework is more scalable, maintainable, and readable, which makes it a widely used design pattern in automation testing
Steps to Design Page object model:
Step 1: Create a New Java Project in Eclipse: Create New Java project in Eclipse(It is an IDE – Integrated Development environment) – it will create JRE System Library and src package with module-info.java file
- Delete module-info.java file since we are developing testing framework
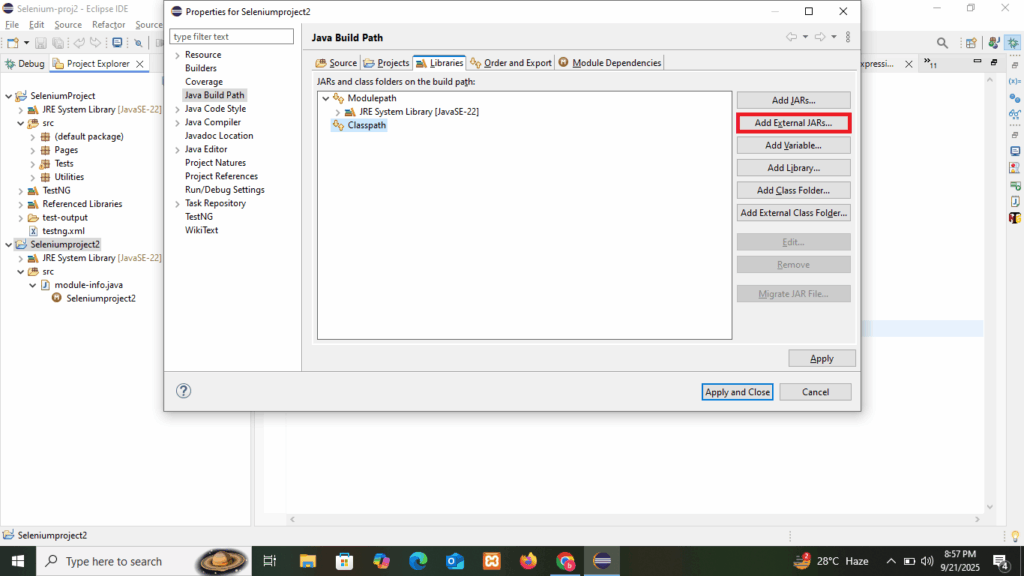
- Associate Selenium file to the project: Associate selenium with java libraries to project by right click on the project repository and select Build path –> Configure Build path. Click on class path loaded under Libraries and add all the selenium and client libraries by adding external jars
Step 2: Add Different Packages
Organize your project by creating separate packages to maintain clarity and modularity:
pages→ Contains Page Object classes representing each application page.tests→ Contains all test classes where the actual test scripts are written.resources→ Stores configuration files (e.g.,config.properties), test data, and other supporting resources.utilities→ Contains helper classes such as driver managers, common functions, and reusable methods.
This package structure ensures the framework is clean, maintainable, and scalable, making it easier to manage as the project grows.
Step 3: Add TestNG Suite
Add a simple test method and annotate it with @Test from TestNG.
3.1. Create a Test Class
Inside the tests package, create a new Java class.
import org.testng.annotations.Test;
public class SampleTest {
@Test
public void demoTest() {
System.out.println(“TestNG is working!”);
}
}
3.2. Add TestNG Library
- Right-click on your project in Eclipse.
- Select Build Path → Add Libraries → TestNG → Next → Finish.
3.3. Generate TestNG Suite File (testng.xml)
- Right-click on the project and select TestNG → Convert to TestNG.
- A
testng.xmlfile will be created in your project root, which serves as the test suite configuration file. - This conversion enables you to run your tests using the TestNG framework, which provides advanced features such as annotations, parallel test execution, data-driven testing, and detailed reporting.
Step 4: Create the Basic Framework
Now that the project is set up, let’s build the foundation of the automation framework. The framework will consist of the following components:
4.1. Tests
- Test classes are created under the
testspackage. - Each test class will include WebDriver initialization and be linked to the corresponding Page Object classes.
- Tests will call page methods to perform actions and validations.
4.2 Pages
- Each application page has a dedicated class under the
pagespackage. - These classes contain locators and methods for interacting with the elements.
4.3. Resources
- Store test data (e.g.,
.txt,.csv,.excel) inside theresourcespackage. - This ensures that test data is externalized and easily maintainable.
4.4. Utilities
- Create helper classes for common functions such as:
- Selecting values from dropdowns
- Reading from Excel/text files
- Driver setup and teardown
- These reusable methods will be shared across tests, reducing duplication.
By structuring your framework this way, you ensure that it is modular, maintainable, and scalable, making future enhancements much easier.
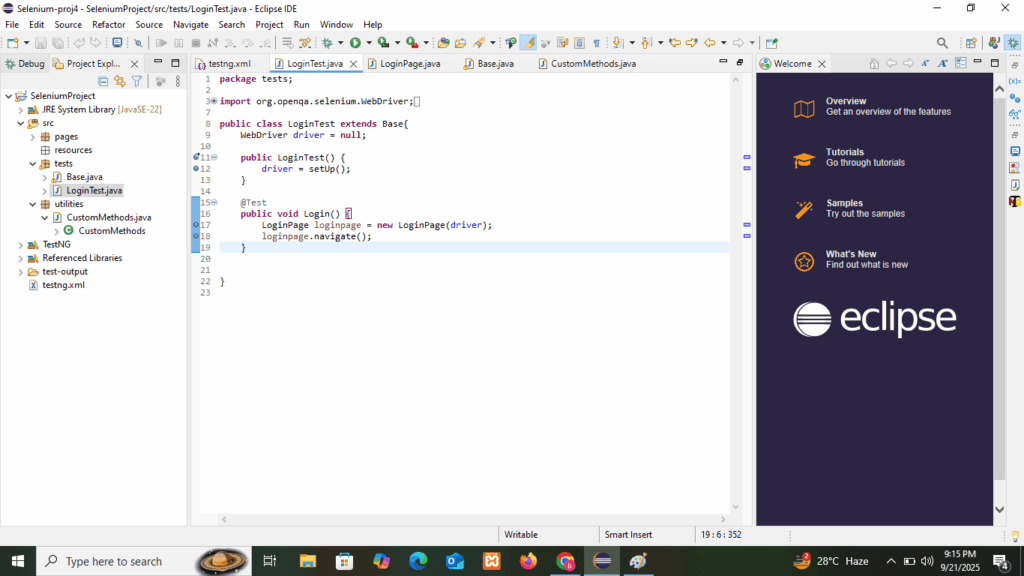
Test Example:
Page example:

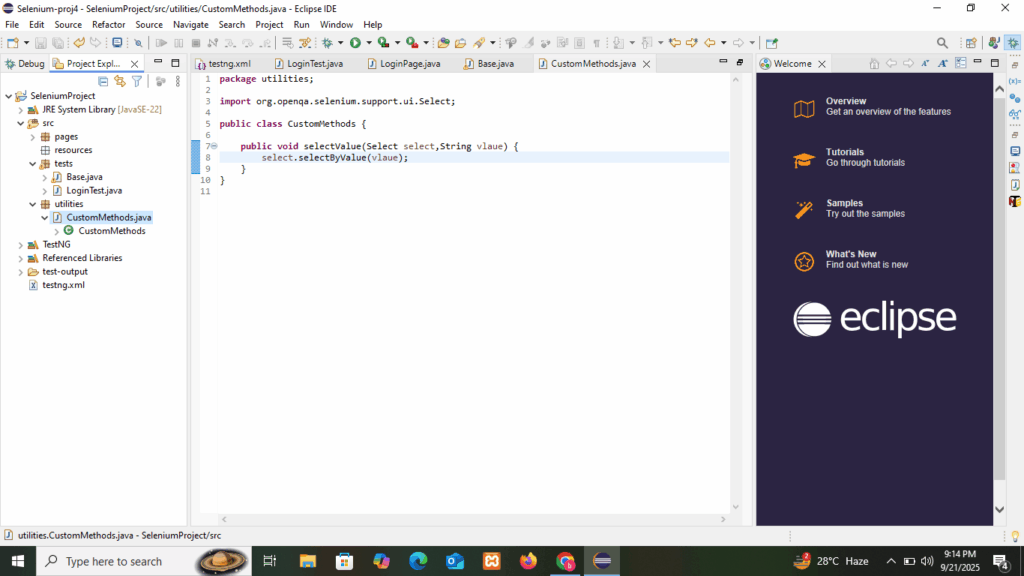
Utilities Example:
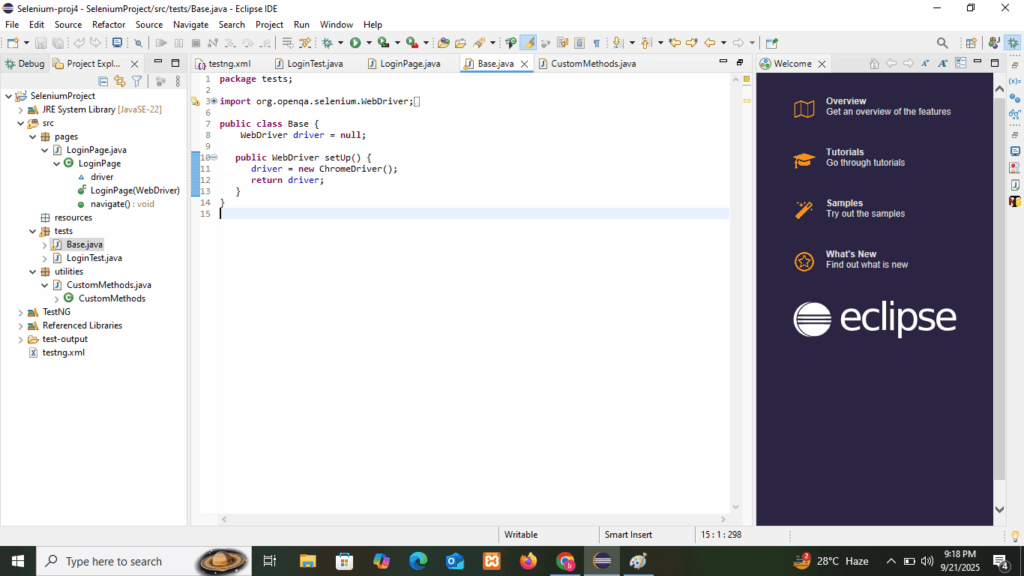
6. In the automation frameworks we will use inheritance for reusability. We can created Base class with setUp() method for initialization of driver where test class will be inherit Base class for driver reusability. We will pass this driver across different pages
Base class example: