In this article, I will explain how to create a Maven project in Eclipse for Selenium automation testing. Eclipse allows you to create Maven projects directly without requiring separate setup steps.
Before you begin, make sure Eclipse is installed on your system. You can download and install Eclipse from the official link as a prerequisite for creating a Maven project.
Below are the step-by-step instructions to create a Maven project with Selenium in Eclipse:
Pre requisites:
- Download and Install Eclipse: Download the Eclipse installation file from Eclipse downloads and and install it on your local machine before proceeding with the Maven project setup.
- Download and Install JDK(Java Development Kit): Download the Java Development Kit (JDK) from the official JDK Downloads web site. and install it on your system. Ensure the JDK is properly configured before creating your Maven project in Eclipse.
Steps to Create Maven Project:
- Launch Eclipse and select your preferred workspace location.
- Navigate to File → New → Maven Project.
- In the New Maven Project wizard,Select ‘Use Default Location’ and Click on Next button
- In New Maven Project dialog box select the catalog as ‘Internal’ and filter with ‘org.apache.maven.archetypes’ and select the the project with Group Id as ‘org.apache.maven.archetypes’ and Artifact Id as ‘maven-archetype-quickstart’ with latest version and click on Next
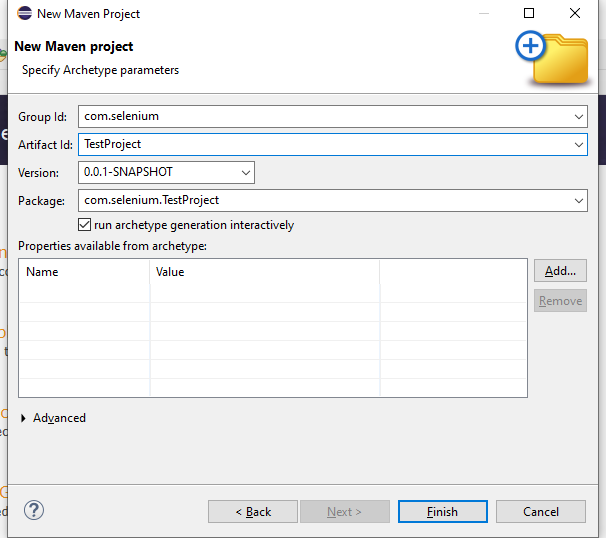
- Enter the project details: Group Id(Ex: com.Selenium) and Artifact Id(Ex: TestProject) and click on Finish button.
- The Maven project creation process will start. You can monitor the progress in the Eclipse console.
- If prompted in the console, click inside the Project Explorer, type Y, and press Enter to continue the project creation process.
- Once the process completes, you will notice that the Maven project has been successfully created in Eclipse.

Update POM.xml for dependencies:
Open the pom.xml file in your Maven project and add or update the required dependencies for Selenium WebDriver and TestNG. After updating the dependencies, save the file and allow Maven to download and configure the required libraries automatically.
Selenium Dependecy:
<dependency>
<groupId>org.seleniumhq.selenium</groupId>
<artifactId>selenium-java</artifactId>
<version>4.35.0</version>
</dependency>
TestNG Dependecy:
<dependency>
<groupId>org.testng</groupId>
<artifactId>testng</artifactId>
<version>7.11.0</version>
</dependency>
Create and Run Selenium Project
You are now ready to create your Selenium project. Develop your Selenium test cases within the Maven project and execute them by right-clicking on the pom.xml file, then selecting Run As → Maven Test.
Maven will build the project, download any required dependencies, and run the Selenium test cases automatically.
Watch YouTube Video here: How to Create Selenium Maven Project in Eclipse | Complete Setup with Selenium, Java and Maven
Watch YouTube Video for Installing selenium with out Maven – How to Install Selenium WebDriver in Eclipse